
Book-making
There is no single way to make a book. Here we give general instructions for learning the ropes (the secret is to really begin). Rather than learn to make books *one* particular way, these instructions give suggestions and encourage bookmakers to develop their own methods. This is a guide informed by the mistakes we've made through years of anarchist publishing.
Bookmaking is contingent on many things going right and unique problems inevitably arise as a result of machinery, impatience, misunderstanding, and bad luck. A DIY ethic, some stubbornness, and an abiding curiosity are required to see it through, and this project aims to support those exploring this beautiful and frustrating process.
Boxy the Boxcutter
Boxy is here to help as your neighborly print shop companion. They've lived in print shops their whole life and absorbed tons of insight over the years. They'll periodically chime in with tips.

"For every new book you make, do a test print of this process from beginning to end to confirm that things go as you expect them to. Strange but meaningful quirks hide in the most mundane of tasks!"
Equipment
See recommendations and machine-specific notes in our Equipment Guide.
- printer capable of double-sided printing
- paper cutter
- book binder
- creaser
- paper
- paper jogger (optional but recommended)
Print guts
Before you print the pages of your book, otherwise known as the guts, make sure you're printing on paper with the proper grain direction for the book. You may need to cut larger sheets of paper in half to change the grain direction. See "What is paper grain direction?" in the FAQ for more details.

"Understanding paper grain direction is a crucial book-making concept!"
- Go to the book you want to print and download its guts file from the book's specifications table.
- Cut your paper as needed to achieve the proper grain direction.
- Load your paper into your printer and print the guts file. After a few pages have printed, verify that your print job looks right. Catching mistakes early will save you time and money. Save all paper from fucked up print jobs. It'll make great padding when you cut your books later on.
- Jog book blocks as you remove them from the printer output tray and keep them organized however you prefer. If leaving them for more than a couple of hours, consider weighing them down with text books or something. Paper stores best when it's kept flat and at low humidity.
Cut spreads
You've printed your guts, now it's time to cut the pages, otherwise known as a "spread," in half to create individual book blocks.
- First, set your paper cutter to cut the 2-up spread precisely in half to make single book blocks. If the pdf is 4-up, then you'll cut in half both vertically and horizontally.
Note: If cutting 4-up spreads, it's easier to cut "hamburger" first (ie, parallel to the short side). - Next, jog your spreads and place them in your paper cutter.
Cut the spreads in half to create two individual book blocks. How many you cut at once depends on the strength of your cutter and the height that your cutter allows for.
"If you cut more than one book block at a time, you can add some kind of physical separator, like a thin strip of paper, to easily distinguish between multiple book blocks."
Prepare covers
With your book blocks ready, it's time to print and prepare your covers.
Print covers
- Go to the book you want to print and download its cover file.
- Check the suggested paper size and weight for your book's cover and load the proper paper into your printer.
- Print the cover PDF file.
Crease covers
Many binders require cover creases to seat the guts correctly within the spine. If you use a binder like a Fasbind Secura (Contagion Press uses this), creases are required to seat the guts in the spine correctly. If you use a binder like the Duplo DB-280 (LBC used this), creases aren't mandatory for this step.
Beware! Creasing covers using a tabletop creaser, in our experience, can be extraordinarily finicky. You must test bind any scoring measurements you have arrived at---the creaser is not accurate enough to fine-tune the measurements without this. You don't want to crease a whole big run of covers only to find out your measurements were just slightly off. The thinner your book is, the more important your measurements are (there's less margin for error). So...
Prep: Preheat the binder so that you are ready to test bind. Print one copy of the book you need to crease covers for. If the spine of the cover is not already centered on the page, you must trim the cover to make it centered.
This formula will not work without a centered spine. If you have uncentered covers and do not have access to a cutter at this stage and need to crease and bind anyway, see Note 1.** If you are able to center the covers, the process of scoring will be much faster.
- Squeeze the book block at the edge, and measure the thickness with a ruler. This is your estimated spine width. Measure the long edge of the cover. This is your total cover length.
- Subtract the spine width from the total cover length. Divide that number by two. This is the distance from the edge of the front cover to the front edge of the spine (equally, the distance from the edge of the back cover to the back edge of the spine). This is your "scoring number".
- Set your creaser to the number you got in step two. Tighten down the guide, and make sure it is at a right angle to the bottom edge of the creaser.
- Set your cover in the creaser against the guide, and crease firmly. Flip the cover so that the opposite edge is now against the guide, and crease firmly. You should now have parallel creases on what will become both spine edges.
Following the instructions for the type of binder you have, test bind the book using this creased cover. Are the creases you made actually on the spine edges? If one or both are on the spine itself, your scoring number is too big. If one or both are on the front or back covers, your scoring number is too small.
"Take heed! Since your scoring number is applied to both front and back, changing it has a doubled effect on increasing or decreasing the width of the scored spine. A little goes a long way!"
- Continue to test bind and fine tune until you are satisfied with how the cover sits on the spine when bound. The scored edges should be parallel, precisely on the corners of the spine, with all the pages of the book comfortably between.
- Write down your final scoring number. While you will still need to test bind to double check and fine tune next time you score this title, the scoring number will be a solid starting point, assuming all variables have remained the same.
"Scoring large quantities of covers while you have the creaser at a good measurement can save you having to repeat this fine-tuning process later."
Bind guts and covers
With your covers and guts ready, it's time to bind them, that is, connect them with glue. Steps for binding will vary depending on your specific setup, but the process below assumes a manual, rotary-style binder (like a Fastbind Secura) since they are less expensive and easy enough to source.
Always follow safety, maintenance, and usage best practices for your specific equipment.
- First, turn your binder on and allow it to heat the glue to temperature so it melts. Different glues require different melting temperatures, but this usually takes ~20 minutes.
- Once your glue is ready, place your cover face down in the binder with the spine seated in the cradle of the binder.
Next, jog your book guts and place them within the cover's spine, making sure guts are neat and flush with the bottom of the cover.
"Ensure your guts and cover have the same orientation. It's easy to accidentally bind a book backwards or upside down."
- Engage the clamp and rotate your book so the spine appears at the top of your binder.
- Next, while holding the cover out of the way, score the spine with notches. This helps the glue hold stronger.
- Once scored, run the hot glue applicator across the spine, usually twice unless the book is very thin, to apply glue to the book block.
- Then, quickly before the glue starts to set, flip the book back to its original position and push the lever down firmly to engage the front clamp that affixes the cover to the guts. Hold this pressure for 3-5 seconds.
- Release pressure, disengage the clamp, and gently pull the book out by the guts and back cover. After the cover is bound, immediately place the book flat on a table and weigh it down (for example, with a heavy textbook) for 30 seconds as the glue continues to dry.
- After the glue has dried, perform the following quality checks on the book:
- is the spine text (title, author, etc.) centered? If not, adjust crease measurements.
- is the spine well bound? After giving the glue a few seconds to dry, use gravity to test by suspending the book by its cover.
- Clear away any excess glue (with a rag or your hand) that may have spilled onto the binder before binding the next book.
Make padding
The purpose of padding is to counteract the harshness of print shop machines that tend to tear book covers and crush spines due to their mechanics. Padding absorbs these imperfections so books can look their best.
You'll need two types of padding when cutting books: disposable padding you'll intentionally cut through and reusable spine padding you won't cut through.
"Padding is a little confusing but also totally necessary. Many folks stay confused about it until they've been using it for a while and then it becomes clear. So have patience, keep using it, and it will come to you."
Disposable padding
Make disposable padding out of spare or recycled paper you have, whether that's 8.5x11" paper, cover stock, cardboard, etc. The thickness of your padding depends on the thickness of the books you're cutting. You'll learn to adjust padding thickness according to book size, but a good starting point is about 10 pages of standard paper for each piece of padding.
- Set your cutter to the suggested width measurement of your book
- Place your recycled paper in the cutter so it's trimming the width of the page.
- Cut the recycled paper to the set width.
- Next, separate the cut paper into four equally sized stacks and set them aside, for now. (Optional) Label two stacks of paper "outside" and the other two stacks "top/bottom" to keep them organized. These stacks of padding will be used in the next section.
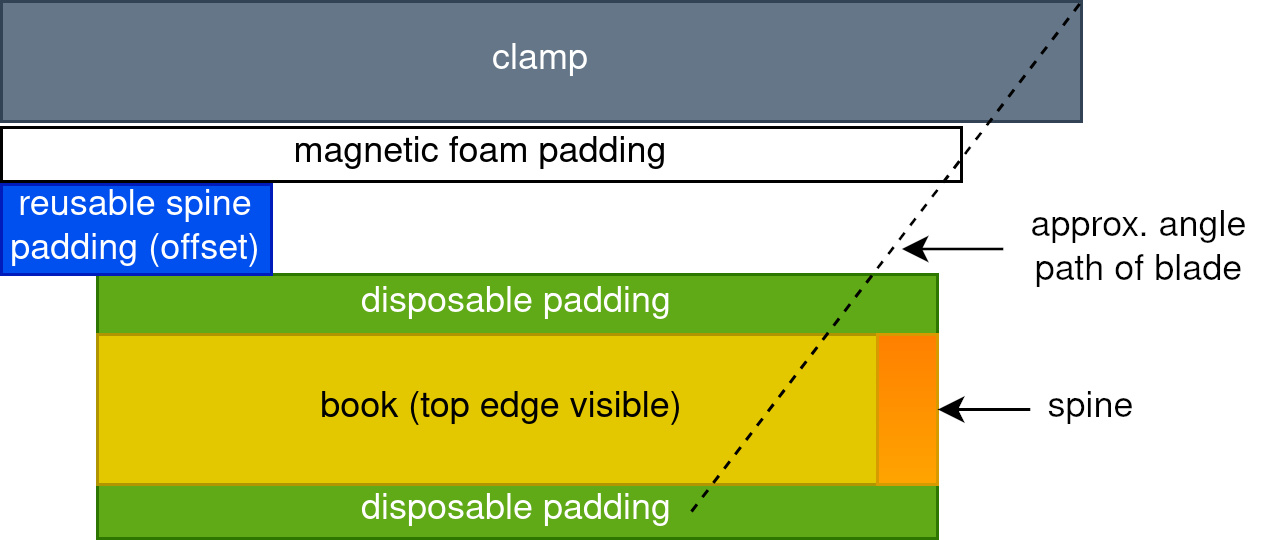
Reusable spine padding
To protect the spine from excessive force from the clamp and/or cutter blade, you need extra padding to displace compression. You can tape paper together to the right thickness, or if you have an unwanted book
or notebook with a ~0.5" spine, cut it down (preserving the spine so the pages stay together) to serve as reusable spine padding.
"Having multiple reusable padding thicknesses for different book sizes is helpful."
Trim edges
With your padding prepared, it's time for the final step: trimming book edges to your desired width and height.
There are three trims that must be made: long edge (opposite the spine), and top and bottom edges.
All trims use disposable padding above and beneath the book/stack of books. Since top and bottom trims involve cutting through the book's spine, reusable padding is required.
"Diagrams are provided in later steps to show how to arrange all this padding."
Suggested cut width and height values are provided in each book's specifications, but exact measurements are a matter of personal preference depending on your cover design and how tight or spacious you like your margins. You'll need to determine how much to trim from each edge to get the margins you like on each side. Some people make cutting decisions by sight, while others prefer to calculate exact measurements. Do what works best for you and your print shop.
"The more material a single cut takes off, the rougher the edge will likely be. For a crisper edge, make final little trims of 1/16th", but be sure to account for such additional cuts beforehand. Measure twice, cut once!"
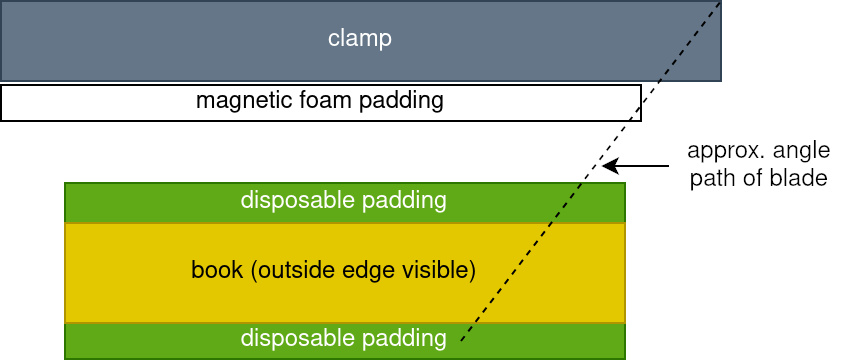
Long edge trim
The long edge is done first, to ensure that it is parallel to the spine, and because this cut places no pressure on the spine, which may not have reached maximum tensile strength if it was recently bound.
- Set your cutter to your preferred outside margin on the long edge of the book.
- Place the book's spine against the backstop of the cutter.
- Next, place your disposable padding on top of and beneath the book as indicated in Figure 1, and trim the long edge.
Top edge trim
The top and bottom trimming requires extra care because the spine could get crushed by the pressure of the clamp or the blade.
- Set your cutter to your preferred top margin measurement (reminder: you'll need to determine the margin spacing you want).
Next, place the bottom of your book against the cutter's backstop.
"Make sure the book's spine is oriented properly in your cutter so that the blade passes through the spine first before the rest of the book."
- Place your "top/bottom" disposable padding on top of and beneath the book as shown in Figure 2, and perform the Top cut.
Bottom edge trim
- Set your cutter to your preferred bottom margin measurement (reminder: you'll need to determine the margin spacing you want).
- Place the top of your book against the cutter's backstop.
- Place your "top/bottom" disposable padding on top of and beneath the book as shown in Figure 3, and perform the Bottom cut.
